XpertPromotions™
Chapter Topics
Promotions Catalog
Promotion Requirements
Promotion Benefits
Sample Promotions
Promotion Tracking
Promotion Cuopons at the Point of Sale
Logic Behind Promotions Module
One of the most important tools of the retail trade is promotions.
XpertMart™ allows you to
create all kinds of promotions to be
automatically applied at Point of Sale with the XpertPromotions™ module. By
having promotions defined in the Promotions Catalog
you avoid
having to permit manual
discounts at the point of sale. All sales made as part
of a promotion are linked to the promotion they were sold under so you
can also
run reports to see how effective each promotion has been. Each
promotions is
also tied to a Promotion Manager, Promotion Distribution Method and
Promotion
Target Market so you can also run reports to see the results obtained
for each
of these dimensions.
Promotions
Catalog
Promotions are defined in the Promotions Catalog. To access
the Promotions Catalog you select the option under the Catalogs menu,
as seen in
this screen shot:
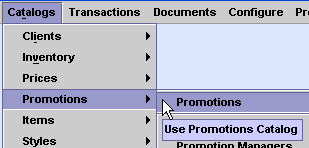
Once you select the Promotions Catalog you will see the
following catalog window:
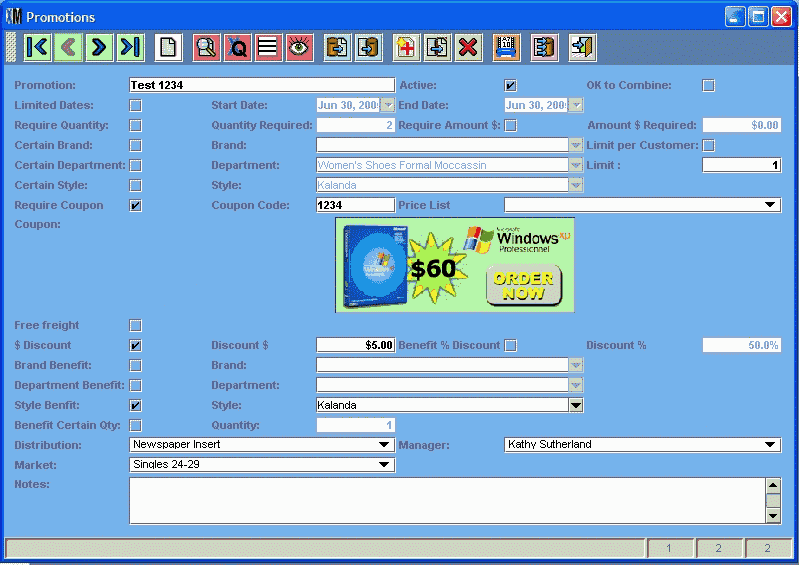
You can
insert a photo of the coupon in the center of the Promotions Catalog. Every
promotion can consist of
two parts. The first part is the requirements
needed to qualify for the
promotion. The
requirements section starts at the top of the window and goes
all the way down to the coupon photo. The second
part of the promotion is the benefit of
the promotion.
The benefits section starts below the
coupon photo and continues down to the distribution field.
Each promotion can have a name entered in the
"Promotion" field. Promotions need to have the "Active"
check box checked in order to be applied at the Point
of Sale.
Promotion
Requirements
OK
to combine: The "Ok to combine" check box determines whether
the promotion can be combined on the same sale with any other
promotion. If
this check box is not checked then this promotion will not be applied
to a sale
which already has some promotion applied to it, even if the sale meets
all the
requirements of the promotion. On the other hand, if a sale already has
a
promotion applied to it that does not have the "Ok to combine"
checked then no other promotion will be applied even if the all the
additional
promotion requirements are met.
Limited
Dates: If you want a promotion to only be valid for certain
days,
then you should check the "Limited Dates" check box and enter the
beginning and ending dates for the promotion. The promotion would
only be
applied during these dates if you select this option.
Required
Quantity: You may want to require the purchase of a certain
quantity
of items in order to qualify for this promotion. If you check the
"Require
Quantity" box then you should enter the quantity you wish to require in
the "Quantity Required" field. The promotion will only be applied if
the customer purchases the specified quantity of items.
Required
Amount: You may want to require the purchase of a certain dollar
amount in order to qualify for this promotion. If you check the
"Require
Amount" box then you should enter the amount you wish to require in the
"Amount $ Required" field. The promotion will only be applied if the
customer
purchases the specified dollar amount.
The next set of check boxes and fields lets you select whether you
require the purchase of a certain Brand, Department, Style or Brand and
Department combination to get the benefits of the promotion.
Certain
Brand: To require the purchase of a certain Brand to get the
benefit of the promotion you should check the "Certain Brand" check
box and then select which brand is required in the "Brand" menu
field. If you require the purchase of a certain brand to qualify for
the
promotion then either the Quantity Required or the dollar Amount
Required would
refer to the quantity of this brand or the dollar amount of purchase of
this
brand.
Certain
Department: To require the purchase of a certain Department to get the
benefit of the promotion you should check the "Certain Department"
check box and then select which department is required in the
"Department" menu field. If you require the purchase of a certain
department to qualify for the promotion then either the Quantity
Required or
the dollar Amount Required would refer to the quantity of this
department or
the dollar amount of purchase of this department.
Certain
Style: To require the purchase of a certain Style to get the
benefit of the promotion you should check the "Certain Style" check
box and then select which style is required in the "Style" menu
field. If you require the purchase of a certain style to qualify for
the
promotion then either the Quantity Required or the dollar Amount
Required would
refer to the quantity of this style or the dollar amount of purchase of
this
style. If you choose to require a certain style, then you will not be
able to
also require either a certain brand or a certain department as the
style
already belongs to a specific brand and department.
You can require that the purchase be of both a certain brand
and a certain department. This would permit you to require the purchase
of "Christian Dior" "Men's Shirts Formal" for
example. Only items that belong both to the selected brand and the
selected
department would count as fulfilling the requirements of the promotion.
Limit per
Customer: If you check the "Limit per Customer" check box
then in the "Limit" field you should put the number of promotions
that can be given to one customer. (In
reality this refers to promotions per
single Invoice. The system will not check
if the customer has another invoice
with the same promotion on it). If you have a promotion that requires
that the
customer buy two pairs of a certain style pants and they get a third
one free,
then normally they could buy four pairs of the style of pants and get
two free.
If you only want them to be able to use the promotion once, then you
use the
limit per customer field. It would be the sales clerk's responsibility
to
ensure that the customer does not buy on two separate invoices to get
around
this limitation.
Require
Coupon: If the customer needs to present a coupon to get the
benefits of the promotion then you need to check the "Require Coupon"
check box. You should also then enter a code for the coupon in the
"Coupon
Code" field. If you wish, you may put a photo of
the coupon in the space
below the "Coupon Code" field. If you require a coupon for the
promotion then the promotion will not be applied unless the coupon is
entered
at point of sale, irregardless of the fact that they may meet the other
requirements for the promotion.
Price
List: If the promotion is only to be applied to a particular Price List then you need
to select the price list in the "Price List" menu
field. If you select a price list then both the items required for the
promotion as well as the items to receive the benefit of the promotion
must be
entered at the Point of Sale with the price
from the specified price list. If you
do not select a price list then the promotion will be applied to all
sales
irregardless of the price list used to price the items.
Promotion
Benefits
After the photo of the coupon you specify the benefit a
customer is to obtain from the promotion.
Free
Freight: The first benefit is free freight. This benefit would
apply
mainly to catalog or internet sales. If you check the "Free Freight"
then the invoice will be marked for free shipping.
Discount
$: If the benefit is to be a specific amount off, then you need
to check the "$ Discount" check box. Then in the "Discount
$" field you put the dollar amount to be discounted as a benefit for
this
promotion.
Discount
%: If the benefit is to be a percent discount off, then you
need to check the "Benefit % Discount" check box. Then in the
"Discount %" field you put the percentage to be discounted as a
benefit for this promotion.
The next set of check boxes and fields lets you select whether the
benefit applies to the purchase of a certain Brand, Department, Style
or Brand
and Department combination.
Brand:
The benefit may be specified as only for a certain brand. To
do this you would check the "Brand Benefit" check box and in the
"Brand" menu field you would select the Brand the benefit is for.
This means that the customer would receive the benefit on one or more
items of
a certain brand if they also purchase the item(s) of that brand. The
item(s) purchased
to which the benefit would apply would be in addition to any items
required to
get the benefit. (Examples follow).
Department:
The benefit may be specified as only for a certain Department. To do this
you would check the "Department Benefit" check
box and in the "Department" menu field you would select the
Department the benefit is for. This means that the customer would
receive the
benefit on one or more items of a certain department if they also
purchase the
item(s) of that department. The item(s) purchased to which the benefit
would
apply would be in addition to any items required to get the benefit.
Style:
The benefit may be specified as only for a certain Style. To
do this you would check the "Style Benefit" check box and in the
"Style" menu field you would select the Style the benefit is for.
This means that the customer would receive the benefit on one or more
items of
a certain style if they also purchase the item(s) of that style. The
item(s)
purchased to which the benefit would apply would be in addition to any
items
required to get the benefit. If you choose to benefit a certain style,
then you
will not be able to also benefit either a certain brand or a certain
department
as the style already belongs to a specific brand and department.
The benefit may be specified as only for a certain brand and
department combination. To do this you would check the both the "Brand
Benefit" check box and the "Department Benefit" and in the brand
and department menu fields you would select the Brand and Department
combination the benefit is for. This means that the customer would
receive the
benefit on one of more items of a certain brand and department
combination if
they also purchase the item(s) of that brand and department
combination. The
item(s) purchased to which the benefit would apply would be in addition
to any
items required to get the benefit.
Benefit
Certain Qty: If the benefit is to be limited to a certain
quantity of
items then you need to check the "Benefit Certain Qty" check box.
Then in addition you enter the maximum quantity of items that can
receive the
benefit in the "Quantity" field.
If you do not specify that the benefit is for a Brand,
Department, Style of Brand and Department combination, then the
discount amount
or discount percent will be applied to the invoice itself. If you
specify that
the benefit is for a Brand, Department, Style of Brand and Department
combination, then the discount
amount or discount percent will be applied to
the item line on the invoice.
Sample Promotions
While the Promotion Catalog entry seems rather
simple this
design allows a great flexibility in regards to the promotions you can
offer.
The following are some sample promotion (though they are by no means
are these all the types of promotions
you can make).
Note: On all the examples you may select that they may be combined (or
not) and
may select that they are for a specific date range (or not), so we will
not
mention those variants for each example.
1) $5.00 off next purchase with a
coupon - You just check "Require
Coupon" and enter the "Coupon Code". In the Benefits
section you
check "$ Discount" and in the "Discount $" amount field you
put $5.00.
2) 15% Discount on purchases over $600
- You check "Require Amount $"
and in the "Amount $ Required" field put $600. In the Benefits
section you check "Benefit % Discount" and in "Discount %"
field you put 15%.
3) 20% off all Levis brand Women's
Pants Dress Jeans - In the Benefits
section
check the "Benefit % Discount" box, in the "Discount %"
field enter 20%. In the Benefits section
you check "Brand Benefit"
and in the "Brand" menu field select "Levis". Check the
"Department Benefit" and in the "Department" menu field
select "Women's Pants Dress Jeans".
4) Two for 1 and 1/2 on Men's
Shoes Boots Dress - In the Requirements
section check "Require Quantity" and in the "Quantity
Required" filed enter 1. In the Requirements
section check
"Certain Department" and in the "Department" menu field
select "Men's Shoes Boots Dress".
In the Benefits section check the
"Benefit %
Discount" box, in the "Discount %" field enter 50%. In the Benefits
section check "Department Benefit" and in the
"Department" menu field select "Men's Shoes Boots Dress".
Check the "Benefit Certain Qty" box and in Quantity enter 1.
5) Free "Missy" style purse with
purchase of "Kalanda"
shoes - In the Requirements section
check "Require Quantity" and in
the "Quantity Required" filed enter 1. In the Requirements
section check "Certain Style", and in the "Style" menu
field select Kalanda. (XpertMart™
will know that the Kalanda style is a shoe!)
In the Benefits section check the
"Benefit %
Discount" box, in the "Discount %" field enter 100%. In the Benefits
section check "Style Benefit" and in the "Style"
menu field select "Missy". Check the "Benefit Certain Qty"
box and in Quantity enter 1. (XpertMart™
will know that the Missy style is a
purse!)
Again, there are literally hundreds if not thousands of possibilities.
Contact XpertMart™ tech
support if you need assistance with a certain type of promotion.
Promotion Tracking
The last three fields before the Notes section of the
promotion allow you to link the promotion to a Promotion Manager,
Promotion
Distribution Method and Promotion Target Market so you can also run reports to
see the results obtained for each of these dimensions.
To enter your promotions distribution methods you use the
Promotion Distribution Catalog. You select this catalog under the
catalogs menu
as shown here:
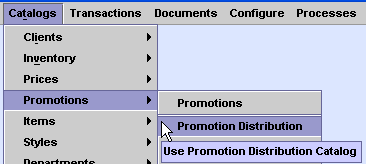
Once you select this option the
catalog opens as shown here:

Basically you want to name your distribution methods. You
can describe them more thoroughly in the Notes section.
To enter your promotions managers you use the Promotion
Managers Catalog. You select this catalog under the catalogs menu as
shown
here:
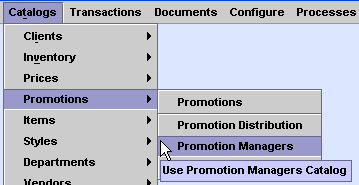
Once you select this option the
catalog opens as shown here:

Enter the
name of the employee who will be managing the distribution of the
promotion. You can also enter additional information in the Notes
section.
To enter your promotions target markets you use the
Promotion Market Catalog. You select this catalog under the catalogs
menu as
shown here:
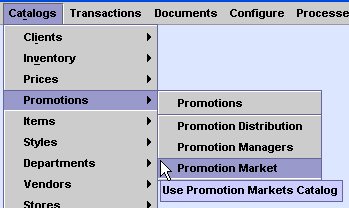
Once you select this option the catalog opens as shown here:

Basically you want to name your
distribution target markets. You can describe them more thoroughly in
the Notes
section.
Promotion Coupons at the Point
of Sale
To receive and use Promotion Coupons at the Point of Sale
you must enter the "Promotion Coupon" payment type in the Payments Catalog. The "Promotion Coupon"
payment type must have ID 12.
(PAYMENTS_ID = 12). You may call this payment type something else if
you wish,
but XpertMart™ will take
payment with ID = 12 as a promotion coupon and will
process it accordingly.
When you have this payment type defined and wish to enter a
Promotion Coupon at POS then you simply select this payment type in the
payments section of the sales screen
as show here:
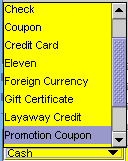
Once you select this payment
type, XpertMart™ will show
you a menu of all Promotion Coupons that are active
in the Promotions Catalog. You simply select
the one the customer is using from
the menu as shown here:
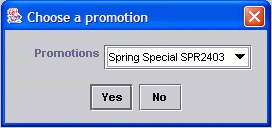
You will not enter a
value amount for the coupon. The amount
in the payment section will be
zero.
(XpertMart™ will not let
you enter an amount for Promotion Coupons.) As
explained above, if the sale meets any additional requirements for
the promotion
then the value or percent discount the coupon represents will be
applied either to the line
the Item is on or as a global discount on the bottom of the invoice.
The promotion coupons are entered in the payment section so
that at the end of the day there is a list of the coupons that should
be turned
in along with the cash and other payments types received.
Logic
Behind Promotions Module
The following are some important points we have taken into
consideration when designing the Promotions module:
1) Since the promotions module is supposed to be automatic,
XpertMart recalculates the whole invoice for promotions each time a
line is added, deleted or modified on an invoice. This is to make sure
that the promotion rules are respected at all times.
For example, if you have a promotion that requires the purchase of two
items to get a third item for free (100% discount). The promotion
module would look and see if you add the first item, then the second
and finally when you add the third item it would apply 100% discount to
this item. But IF you go back and delete one of the two items that were
used to qualify the third item for the 100% discount then the promotion
module goes back in and removes the 100% discount.
2) If we applied promotions to lines with more than one quantity of the
item the discount percentages would get very confusing.
For example, if you had a promotion that says buy one Item "X" and get
the second Item "X" for free (100% discount). If you sell two of the
items on one line then the net discount for the two items would be 50%.
Most users would see this and immediately say that they have no
promotion to give 50% off on an item! The case would be even worse if
on one line you had three of these items. The net discount would be 33%
(2 at full price and 1 at 100% discount).
For this reason we designed the promotions module to use one line on
the invoice either to qualify for a discount or benefit from a discount
but not both things at the same time. While this limits the way you can
ring up promotions, it definitely avoids unacceptable confusion about
discount percentages to the retailer and their customers.
Copyright © 2005
XpertMart
*
Return to Table of Contents*


