Chapter Topics
Records Bar
Toolbar
Toolbar Buttons
Forms
Types of Data
Subforms
Catalogs are the heart of the Main station in XpertMart™ as they are where virtually all the information the system uses gets stored.
XpertMart™ allows you to have several catalogs open at once allowing you to toggle between them. If you are working in one catalog (such as Styles) and need to look for information in a second catalog (such as Vendors), you can open the second catalog without having to close the first.
By design all catalogs in XpertMart™ are very similar
in appearance. Every catalog contains the same three basic elements:
the Records Bar at the bottom, the Toolbar (typically at the top) and the Form in the middle. These 3 elements are always displayed
the same way so that once you have become familiar with one catalog you
should be able to use any catalog.
Records
Bar
The Records Bar is at the bottom right hand corner of every catalog
and contains 3 gray display boxes as shown below.
![]()
The box all the way on the right, the Total Records Box, displays the total number of records in the catalog, In the example above there are 25 records in the catalog being seen. This number only changes as records are added or deleted on the catalog as it always reflects the current number of records.
The box in the middle, the Selected Records Box displays a the number of records that were found after running a query. This number always reflects a subtotal and can never be larger than the number in the Total Records Box, though they can be the same. When you execute a query the Selected Records Box displays the total number of records that conform to the search criteria that was used. For example, if you execute a query asking XpertMart™ for styles whose price is under $30 dollars and the system finds 17 styles with prices lower than $30 dollars, you would see the following:
![]()
After you execute a query you will only navigate through the records the system has selected; in this case, you will only see a maximum of 17 records. This number is updated and refreshed every time you make a query.
The Current Record Box, the first box on the left, shows which of the selected records, ( in this case 17) you are currently viewing; it does not show the ID number (which is the record's permanent address in the catalog) of the record being seen. Instead, it shows the relative position of the record being seen to the Total Selected Records. As you move through the entries in the catalog, the number in hte Current Record Box will change to always reflect the current record being seen.
In the example below, the Currents Record Box is displaying “14” since the user is seeing the 14th record out of the 17 that meet the criteria. (Note that this record is necessarily the record in the catalog with ID = 14).
![]()
Toolbar
The Toolbar is by default at the top of every catalog. However,
the Toolbar can be displayed at the bottom of the screen, along the
left side as a column,
or even anywhere in the middle of the catalog. To move the Toolbar click
on the gray button (shown below) appearing on the left side and drag
the Toolbar to the desired location.
![]()
When you release the mouse button, the Toolbar will appear on its new position.

There are 16 standard buttons in the Toolbar of every catalog. These 16 buttons always appear on the same order. Even when a button is not applicable in the catalog, it will appear grayed out to maintain a consistent look. Some catalogs may have additional specialized buttons, which always appear to the right of the exit button. The images below show sample toolbars from 5 different catalogs. As you can see, the first 16 buttons are standardized, though some include additional buttons.
Styles Catalog:
![]()
Items Catalog:
![]()
Vendors Catalog:
![]()
Invoices Catalog:
![]()
Sale Orders Catalog:
![]()
Toolbar Buttons
For ease of use, the buttons are grouped together by general function,
and each group is color-coded: the green buttons are for navigation;
the red buttons are for queries or searches; the blue buttons are for saving
or restoring a record; and the yellow buttons are for records maintenance.
If you hover the cursor over any of these buttons a tool tip will automatically
appear on the screen with a brief explanation of the buttons function
and where available, a keyboard shortcut. Each button is explained below.
Standard Buttons
![]() First Record: Takes you to the first record in the catalog
being viewed.
First Record: Takes you to the first record in the catalog
being viewed.
![]() Previous Record: Takes you to the record immediately prior
to the one being viewed. Note that in order to optimize the speed of
the system the display of records is not immediately refreshed. Therefore,
when editing records, if you press the previous record button, you
may not see the changes you just saved in the previous record. The changes
are there, you just won´t see them until you refresh the view. You
can refresh the view by pressing the First Record
button or the See All Records button.
Previous Record: Takes you to the record immediately prior
to the one being viewed. Note that in order to optimize the speed of
the system the display of records is not immediately refreshed. Therefore,
when editing records, if you press the previous record button, you
may not see the changes you just saved in the previous record. The changes
are there, you just won´t see them until you refresh the view. You
can refresh the view by pressing the First Record
button or the See All Records button.
![]() Next Record: Takes you to the record immediately after
to the one being viewed.
Next Record: Takes you to the record immediately after
to the one being viewed.
![]() Last Record: Takes you to the last record in the catalog
being viewed.
Last Record: Takes you to the last record in the catalog
being viewed.
![]() Clear Form: Clears every field in the catalog. This button
is typically pressed just before executing a query.
Clear Form: Clears every field in the catalog. This button
is typically pressed just before executing a query.
![]() Lookup by Example: Use this button to do a simple query
or lookup by example. To do this you must first press the Clear Form Button
and then enter your search criteria in any desired field. When you press
this button, XpertMart™ will select those records
that conform to your search criteria. For more information refer to the
Query topic.
Lookup by Example: Use this button to do a simple query
or lookup by example. To do this you must first press the Clear Form Button
and then enter your search criteria in any desired field. When you press
this button, XpertMart™ will select those records
that conform to your search criteria. For more information refer to the
Query topic.
![]() Query: This button launches the XpertQuery™ module and is used for more advanced searches. For
more information, refer to the Query Topic.
Query: This button launches the XpertQuery™ module and is used for more advanced searches. For
more information, refer to the Query Topic.
![]() See All Records: This button allows you to see every record
in the catalog since it removes the previously used search criteria, this
button is mostly used after you are finished looking at a query's results.
Pressing this button, the number of records on the Selected Records Box will equal the Total Records Box. You can also use this button
after entering new data to see all the records in the catalog. For more
information, refer to the Query topic.
See All Records: This button allows you to see every record
in the catalog since it removes the previously used search criteria, this
button is mostly used after you are finished looking at a query's results.
Pressing this button, the number of records on the Selected Records Box will equal the Total Records Box. You can also use this button
after entering new data to see all the records in the catalog. For more
information, refer to the Query topic.
![]() Restore Record: Pressing this button will restore the information
displayed in the record to the way it was the last time you saved. Use
this button if you are editing a record and make a mistake and want to
return to the record to the way it was before.
Restore Record: Pressing this button will restore the information
displayed in the record to the way it was the last time you saved. Use
this button if you are editing a record and make a mistake and want to
return to the record to the way it was before.
![]() Save Changes: Use this button to save a new record or changes
to an existing record. Be sure to press this button before moving on to
the next record or you could lose your work.
Save Changes: Use this button to save a new record or changes
to an existing record. Be sure to press this button before moving on to
the next record or you could lose your work.
![]() New Record: Press this button to add a new record to a
catalog. When you press this button, all fields will go blank
and the number displayed in the Total Records Box
should increase by one. When you are done entering information, you will
need to press save for the new record to be entered into
the database. When you enter a catalog for the first time, you will
need to press this button before you enter data or it will not be saved..
New Record: Press this button to add a new record to a
catalog. When you press this button, all fields will go blank
and the number displayed in the Total Records Box
should increase by one. When you are done entering information, you will
need to press save for the new record to be entered into
the database. When you enter a catalog for the first time, you will
need to press this button before you enter data or it will not be saved..
![]() Copy Record: This button creates a copy of the record you
were viewing. This button is similar to the New Record
button, but instead of creating a new record with every field appearing
blank, they appear with information alredy filled in. Use this button to
save time when entering a lot of similar information (for example, styles
that share the same vendor, brand and season).
Copy Record: This button creates a copy of the record you
were viewing. This button is similar to the New Record
button, but instead of creating a new record with every field appearing
blank, they appear with information alredy filled in. Use this button to
save time when entering a lot of similar information (for example, styles
that share the same vendor, brand and season).
![]() Delete Record: Pressing this button will permanently remove
the record from the database. When you press this button XpertMart™ will ask you if you are sure you want to proceed. You
can press <Cancel> on the dialog box that opens up if you
are not. Once a record is deleted. It can never be restored, so
use this button carefully.
Delete Record: Pressing this button will permanently remove
the record from the database. When you press this button XpertMart™ will ask you if you are sure you want to proceed. You
can press <Cancel> on the dialog box that opens up if you
are not. Once a record is deleted. It can never be restored, so
use this button carefully.
![]() Reports: This button will open a list of all reports related
to the catalog you are viewing in the XpertPreview™
window. For example, if you are in the Brands Catalog, only those reports
that analyze the performance of your brands will be displayed in the XpertPreview™ window. For more information, see the Reports topic.
Reports: This button will open a list of all reports related
to the catalog you are viewing in the XpertPreview™
window. For example, if you are in the Brands Catalog, only those reports
that analyze the performance of your brands will be displayed in the XpertPreview™ window. For more information, see the Reports topic.
![]() Replace Where: This button will save you a lot of time
when you need to make mass changes to existing data. The Replace Where
process modifies all records that have been previously been selected
by executing a query. You would use this button if, for example, you
want to change the margin of every Style belonging to a certain Vendor.
By using the Replace Where button, you would only have to enter the new
margin once, and it would be changed in every single record that meets
the criteria specified in the query. To learn how to use this tool, read
the Mass Changes topic.
Replace Where: This button will save you a lot of time
when you need to make mass changes to existing data. The Replace Where
process modifies all records that have been previously been selected
by executing a query. You would use this button if, for example, you
want to change the margin of every Style belonging to a certain Vendor.
By using the Replace Where button, you would only have to enter the new
margin once, and it would be changed in every single record that meets
the criteria specified in the query. To learn how to use this tool, read
the Mass Changes topic.
![]() Exit: Closes the catalog. Be sure to save
changes before using this button.
Exit: Closes the catalog. Be sure to save
changes before using this button.
Specialized Buttons
![]() Matrix: Pressing this button opens the XpertMatrix™ which displays
all stock available in the chain in a Style/Color/Size/Second Size/Store
matrix. Use this button to get a quick view of your stock levels. For
example, a sales clerk in a store where the items are sold out, would open
the matrix to see if the sold out item is in stock anywhere else in the
chain. To learn more about the XpertMatrix™, see
the XpertMatrix™ topic. When
you see this button in the Size Matrix Catalog and Second Size Matrix Catalog
it is used to create the XpertMatrix. To learn more, see the Creating an XpertMatrix™ topic.
Matrix: Pressing this button opens the XpertMatrix™ which displays
all stock available in the chain in a Style/Color/Size/Second Size/Store
matrix. Use this button to get a quick view of your stock levels. For
example, a sales clerk in a store where the items are sold out, would open
the matrix to see if the sold out item is in stock anywhere else in the
chain. To learn more about the XpertMatrix™, see
the XpertMatrix™ topic. When
you see this button in the Size Matrix Catalog and Second Size Matrix Catalog
it is used to create the XpertMatrix. To learn more, see the Creating an XpertMatrix™ topic.
![]() MatrixAdd: Press this button when you want to create an
XpertMatrix™ for a Style for the first time. A window
will open where you can select the colors and sizes you want to use in
your matrix. To learn more see the Creating
an XpertMatrix™ topic.
MatrixAdd: Press this button when you want to create an
XpertMatrix™ for a Style for the first time. A window
will open where you can select the colors and sizes you want to use in
your matrix. To learn more see the Creating
an XpertMatrix™ topic.
![]() Kardex: This button opens the Audit Table or Kardex for
the record you are viewing. If you are in the Items Catalog, for exmaple,
and press this button, a new window will open with that particular item's
Audit Table, which displays every movement that has affected inventory
in the history of this item. To learn more about the Kardex, read the Audit
topic.
Kardex: This button opens the Audit Table or Kardex for
the record you are viewing. If you are in the Items Catalog, for exmaple,
and press this button, a new window will open with that particular item's
Audit Table, which displays every movement that has affected inventory
in the history of this item. To learn more about the Kardex, read the Audit
topic.
![]() Labels: Pressing this button will print bar code labels.
If you are in the Items Catalog and press this button, XpertMart™ will print bar code labels for whatever item you are
currently viewing. If you are in any Documents
Catalog and you press this button, XpertMart™
will print one barcode label for every piece of merchandise in
the document. For more information, see the Bar Codes topic.
Labels: Pressing this button will print bar code labels.
If you are in the Items Catalog and press this button, XpertMart™ will print bar code labels for whatever item you are
currently viewing. If you are in any Documents
Catalog and you press this button, XpertMart™
will print one barcode label for every piece of merchandise in
the document. For more information, see the Bar Codes topic.
![]() Reprint: This button reprints the document you are viewing
in any Documents Catalog using the format
you have previously designated in the Configure Documents menu.
Reprint: This button reprints the document you are viewing
in any Documents Catalog using the format
you have previously designated in the Configure Documents menu.
![]() Payment: You would use this button for either of two purposes:
to credit a new payment to an existing layaway or to edit payments time
and details of a previously saved invoice. Refer to the Layway topic or
to the Editing a Payment topic for more information.
Payment: You would use this button for either of two purposes:
to credit a new payment to an existing layaway or to edit payments time
and details of a previously saved invoice. Refer to the Layway topic or
to the Editing a Payment topic for more information.
![]() Email: Click on this button to send an email to the vendor,
customer or employee whose record you are viewing. For more information,
see the Email topic.
Email: Click on this button to send an email to the vendor,
customer or employee whose record you are viewing. For more information,
see the Email topic.
![]() Charts: Clicking on this button opens a window with a chart
showing eight weeks of sales in units and dollars for the dimension represented
by the catalog registry's entry. For more information, see the Sales
Statistics topic.
Charts: Clicking on this button opens a window with a chart
showing eight weeks of sales in units and dollars for the dimension represented
by the catalog registry's entry. For more information, see the Sales
Statistics topic.
Forms
The Form is the dynamic part of the catalog because it displays
data shown in the database. Therefore, the contents of the Form change
depending on the catalog we are viewing and even the record within a
specific catalog. The Form is what differentiates the different types
of catalogs: the Style catalog, for example, will have a very different
form than the Employee Catalog or Colors catalog.
Types of Data
The Form of a Catalog can have up to 15 different types of data.
Each of the data types are explained below.
![]()
Line of Text: Used to enter a line of text. In most cases,
the number of characters is unlimited as long as it is all on one line.
![]()
Text Area: Used to enter more than one line of text, for
example, in the Notes area of a Catalog or Document. A scroll bar appears
on the right side if you enter more text than can be displayed in the
text area.
![]()
Password: Used to store a password, usually in the Employee
Catalog, or enter a password in the Login
window. This information is encrypted and you will see a string of
asterisks displayed instead of the data you enter.
![]()
Number: Displays a number without a specific format.
![]()
Serial Number: This number is automatically generated by
XpertMart™ and is usually used in Documents. The number appears without
comma separators or decimal points. In the case of documents, the serial
number begins with the store number and is followed by seven consecutive
digits. In the example above, the document is the 12th document of its
type (e.g. Invoice, Receipt or Sale Order) and was done at Store #2.
![]()
Decimal: Displays a number with a decimal format.
![]()
Currency: Displays a number with a currency format. The
currency symbol, decimal notation and other characteristics are automatically
derived from the Operating System's regional settings.
![]()
Percent: Displays a number with a percentage format.
![]()
Date: This field is usually read-only. In the rare cases
where you enter a date, you must do so in text form and respect the
format in use by your Operating System's regional settings.
![]()
Select Date: In this field you use the XpertDate™ tool to enter a date
by clicking on the small button to the right. For more information, see
the XpertDate™ topic.
![]()
Date & Time: This field displays date and time and
is usually read-only. XpertMart™ automatically
"stamps" the date and time into documents using the operating system's
date and time settings.
![]()
Checkbox: This is an either/or option.
The checkbox is either selected (in which case XpertMart™ is told to perform a specific function or a piece
of data is categorized a certain way, for example an item can be categorized
as discountinued) or it is not (i.e. the function will not be performed
or the piece of data will not belong to the category being described). If
you click on the checkbox, a checkmark will appear indicating you have
selected the option. If you click on the checkbox again, the checkmark
will disappear, indicating the option is not selected. In the example above,
the user has chosen to use the Style's price and cost for every Item belonging
to that style by selecting the checkbox.
Image: This is an image that can be inserted from an independent
file. The image can be in .jpg, .bmp or .gif format and is usually a
photo or logo. The image is added to the catalog using the XpertImage™ tool. For more
information, see the XpertImage™
topic.
![]()
Lookup Menu: This is a drop-down menu
which displays a variety of options, each of which is an entry or record
in another catalogue that is being referenced. To lookup a specific
option, you can click on the small downward arrow appearing on the right
side of the field and scroll through the list of options until you find
the one you are looking for. (You can also use the kebyboard and the
<PgUp> and <PgDn> keys). Alternatively, if
the list of options being displayed is too long, you can begin spelling
the option you are looking for and press <Enter> to narrow
the search. For example, if you type "B" and press <Enter>,
you would only see those options that begin with the letter "B" such
as "Bell-Bottoms," "Bikini," "Blouse," "Boots," and so on. You can narrow
your search even further by entering more than one letter into the field.

Lookup by Example Menu: This field is very similar to the Lookup Menu, only it allows for more powerful searches and is typically used when referencing larger catalogs. You can distinguish the Lookup by Example Menu from the Lookup Menu by the gray box that appears around the drop-down button. The button in the Lookup Menu does not have a gray box around it.
Unlike the Lookup Menu, pressing the drop-down button will not display the full list of options in the menu. You must enter an "example" of the data you are searching for. If you want to see every option in the menu, then clear the field and press <Enter>. If you want to only summon the specific option you are looking for, you can type in the full name of the option and press <Enter>. This menu also allows you to only enter partially information to do searches.
As with the Lookup Menu, you can enter the first few letters of a name and all options that begin with that spelling will appear. However, not all searches need to be this hierarchical. You can use a truncator (the "%" symbol) for more powerful searches such as if you only remember one of the words contained in the name (and not necessarily the first). Suppose you are searching your Vendors Catalog and know the vendor you are looking for contains the word "Shoes". In this case, you would clear the field and enter "% Shoes" as shown below:

When you press <Enter>, you will see all Vendors that contain the word "Shoes" as shown below:
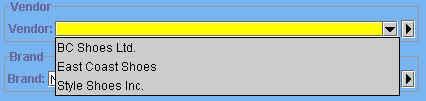
You are now free to choose any of the options that appear in the drop-down menu.
You can use the truncator (%) in any position. For example, if you entered "Sh%" the system might display both "Shoes" and "Shirts" as options. You can also use more than one truncator in your search. Note that the Lookup by Example menu is case sensitive.
Subforms
Within the Form of some catalogs there are subforms. A subform
is an embedded catalog within the catalog you are viewing and is referenced
by either a Lookup Menu or a Lookup by Example Menu. Subforms are always bordered
by a box of thin, gray lines.
The image below is of a sample Stores Catalog. In this catalog we can see that there are 5 subforms: Chains, Store's Region, Category of Store, Tax Zone and Price List.
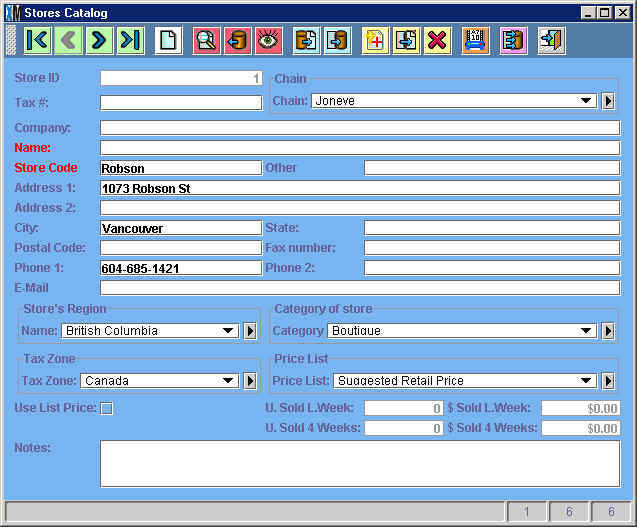
Each one of these subforms is a reference to an independent catalog that is somehow related to the catalog you are viewing. For example, the Chain subform is a reference to the Chains Catalog which is a stand-alone catalog of its own and can be opened through the Catalogs Menu in the Main Menu. In this case, every store can belong to a Chain just as it can belong to a Store Region or Store Category. Every option in the Lookup Menu or Lookup by Example Menu is a record in the Chains catalog. If you add a record to the Chains Catalog, it will appear as an option the next time you use the Chains Lookup Menu in the Stores Catalog.
You can open the catalog being referenced in the subform directly without having to exit the catalog by pressing the zoom button (shown below) found to the right of every Lookup Menu or Lookup by Example Menu.
![]()
When you press this button, a new window will open displaying the catalog being referenced. In the example above, if you press the zoom button in the Chains subform, the Chains Catalog will open.
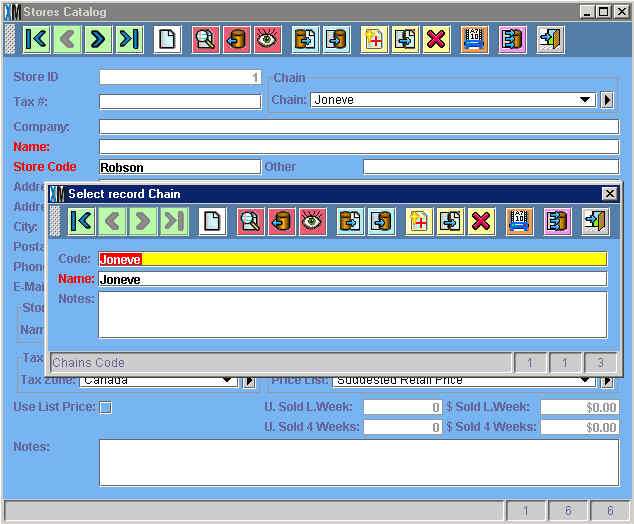
When you open a catalog using the zoom button, it will open to the record you were viewing when you pressed the zoom button (and not the first record in the catalog). To see all records in the catalog beginning with the first one, press the See All Records button. Any change made to a catalog you open using the zoom button is permanent and will be reflected in the subform in the original catalog you were viewing.
Copyright © 2002 XpertMart